Resource Mapping Tool

The following description of this tool and details on how and why it is was applied exists as part of the ‘Adaptation Toolkit’ that was created collaboratively by SEI and ENDA.
Brief Description
This participatory exercise is conducted in mixed or stratified groups (for example, separate groups of men and women or separate groups of different age or income ranges) to collectively construct an overview or map of the biophysical resources available in the project location. The exercise is interactive and requires the participation of representative stakeholders that will draw the resources on a flipchart or use alternative materials to develop the map. Participants define the visualization of the biophysical resources. Facilitation requires explaining in very clear terms the steps and purpose of the mapping exercise. Once the maps are ready, facilitation is required to encourage discussion and analysis using the maps. This activity takes about one hour.
Specific Objectives
The exercise helps to identify the boundaries of the area to be assessed or project site, the different resources in the site and their spatial distribution. It can also be used to generate group discussions around issues like land tenure, resource allocation and management, use and benefits obtained from the resources and relationships between the different resources. This in turn helps to identify how sensitive people are to different climate hazards / stressors and what they have at their disposal for adapting to new conditions.
Expected Outcomes
- Shared understanding among the participants about the resources in the site and their geographical location.
- Clear boundaries of the case study set.
- Identification of key factors (i.e. institutional settings, customary rights and agreements, regulations, livelihoods, conflicts, etc.) that shape the relationships between the social actors and the biophysical resources in the site.
Activites
Step 1: Creating a map
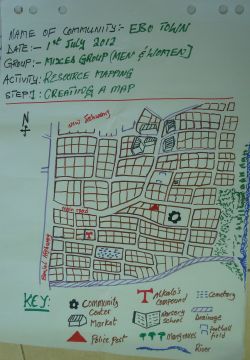
In groups, construct a map illustrating the main natural and physical resources of the site. You can use a flipchart and/or other materials to represent the different resources and their spatial distribution in the map. This exercise encourages effective participation and participants are able to make as many corrections as they need to. After an agreement has been reached on a first sketch as a good representation of the project site, participant representatives can then transfer it on a clean flip chart. Figure 1 and 2 show examples of resource maps.

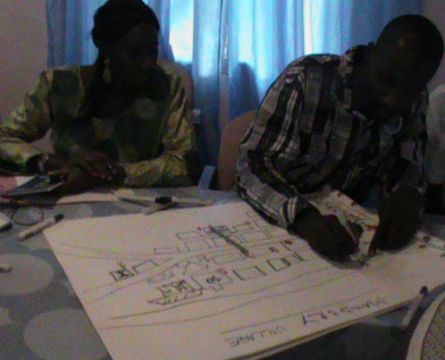
Making a community map- Banjul, Gambia

A resource map of Ebo Town community, Banjul – Gambia.
Step 2: Discussion
In the same groups, discuss formal land use tenure and customary rights based on the map (consider different ethnic, religious and livelihoods groups in the discussion). Some questions that you can use to guide the discussion are:
- Who has access to which areas?
- Who does not benefit from customary rights to access resources in the area and why? (Indicate restrictions/barriers).
- What property rights apply in the area?
- What resources are managed under a legal contract? By whom?
- What regulations apply on what areas?
- What livelihoods depend on what resources?
- What conflicts are there on natural resources?
Step 3: Use and benefits analysis
Working in the same groups, discuss how participants use the resources mapped and how they benefit from them. Use the following questions as a guide:
- What resources in the map are used to satisfy your needs (resources that benefit you)? List the resources and the satisfied needs using a table on a flipchart (Remember needs can be direct and indirect).
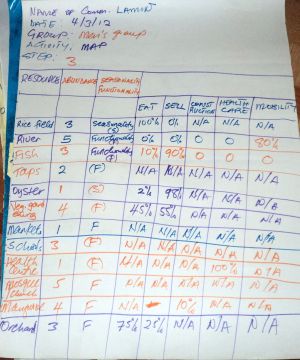
- Describe the resource in terms of abundance, seasonality (if natural resources) and/or functionality (if physical resources). Add this to the table where you listed the resources (see example below).
- How do you use the resources? Add the different uses to the table (see example below). Use stones to define how much of each resource you allocate to the different uses (consider only direct uses, not indirect uses that can be generated by selling or trading the resources).
Table 2: Example of direct resource uses
|
Resources |
Abundance |
Accessibility |
Seasonality/ Functionality |
Direct and Indirect Benefits
|
|||||
Abundance: 1 very rare, 2 few, 3 some, 4 abundant, 5 very abundant
Accessibility: 1 difficult to access, 2 relatively easy to access, 3 very easy to access
Benefits: The participants list some direct and indirect benefits from the natural resources, such as their use for food, trade, construction, health care, and mobility

An example of a resource mapping output
Resources/ Facilities
The equipment / resources needed for this exercise are:
- Flipcharts
- Markers of different colours
- Post-it notes
- Stones (100 for each group)
- Notebooks to take notes of the discussions
Expected Output
The final products of this exercise are maps and tables drawn on flipcharts, as well as a synthesis of the discussions.
(0) Comments
There is no content